How to Declutter Craft Supplies Without Regret
A gentle, one-category-at-a-time method for thinning a craft stash: four boxes, three questions, a container that sets the limit, and a dated box for the things you cannot decide on yet.

At a glance
What you need
- Four boxes or sturdy bags
- Sticky notes or paper labels
- A marker
- The container the category will live in
- Tape to seal the decide-later box
Craft supplies are harder to let go of than almost anything else in a home, because every one of them is a small plan. That skein was going to be a hat. That paper pad was for an album. Getting rid of the supply can feel like giving up on the plan, and on the money already spent.
So the kindest way to learn how to declutter craft supplies is to stop treating it as a judgment. You are not deciding whether you were wrong to buy something. You are deciding what the space you have should hold now. The method below keeps each decision small, gives the uncertain ones a second chance, and makes sure what leaves goes somewhere useful.
Before you start: one category, four boxes
Do not empty the whole room. Choose a single category small enough to finish in one sitting, about an hour: all the paint, one craft’s tools, one shelf of fabric. Finishing a small category feels better and teaches you more than abandoning a large one halfway.
Set out four boxes or bags and label them:
- Keep
- Donate or pass on
- Recycle or discard
- Decide later, with a date written on it about three months ahead
Also set out the container this category will live in afterward. It plays a part in step 4.
The sorting session, step by step
- Gather the whole category. Collect it from every drawer, bag and room, so you see how much you own. Duplicates only show up when everything is together.
- Pull out the easy ones first. Anything clearly unusable goes to discard, and anything you love and use goes to keep. This usually clears half the pile in a few minutes.
- Ask three questions about the rest. Pick up each item once and use the questions in the next section. If you cannot decide in about ten seconds, it goes in “decide later” and you move on.
- Fit the keep pile into its container. If it does not fit, the pile needs another pass.
- Finish the exits the same day. Donations go into the car or by the front door, the discard box goes out, and the “decide later” box is taped shut and put on a high shelf.
Three questions that make the decision easier
Would I buy this again today?
This sidesteps the money already spent. If you would walk past it in a store now, your taste or your projects have moved on, and it can go to someone whose have not.
Do I still do this craft?
Interests change, and that is allowed. If you have not touched a craft in a couple of years and feel no pull toward it, keep a small kit in case, one shoebox at most, and release the rest. If you feel a real pull, keep it and schedule a session.
Is it still usable?
Some supplies wear out in storage. Check for paint that has dried or separated beyond stirring, glue that has hardened in the bottle, markers and ink pads that have gone dry, elastic that has lost its stretch or turned brittle, tape that no longer sticks, and paper that has yellowed or warped. These are not decisions. They are finished, and removing them costs you nothing. For the adhesives you keep, the guide on how to store craft glue covers the habits that help them stay usable.
Let the container set the limit
Willpower is a poor way to decide how much to keep, because every item can be argued for on its own. A container is better. Decide how much space the category gets, such as one bin, two cubes or one drawer, and keep your favorites until it is comfortably full. Whatever is left over is the answer.
“Comfortably full” means filled to just below the rim, with the lid closing easily and room for your hand to lift things out. A bin packed tight is one you will stop putting things back into.
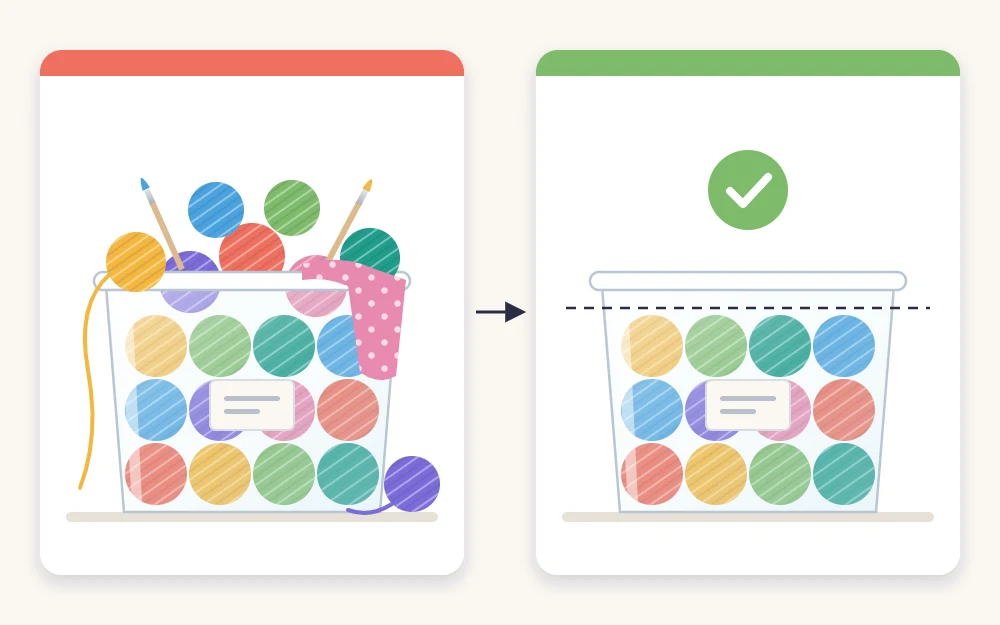
Choose in order of preference: pick the best first, then the next best, and stop when the space runs out. This turns the session into choosing what stays, which is far more pleasant than choosing what goes. Scraps deserve their own limit and a minimum size worth keeping, and the guide to fabric scrap organization shows one way to set both.
Where the supplies can go
Passing supplies on is easier when you know they will be used. Options to try, after asking what each one accepts:
- Schools, preschools and after-school programs, which often welcome paper, markers, yarn and fabric.
- Community centers, libraries with maker programs, senior centers and charity craft groups.
- Craft swaps and local giving groups, where another crafter takes exactly what you no longer need.
- Friends and relatives who do the craft. Offer once, with no pressure to accept.
Donate only what is clean, complete and usable. Bag sets together and label them so the person receiving them can tell what they are.
Safety note
Old paints, sprays, aerosols, solvents and adhesives are not ordinary clutter. Dispose of each one according to its product label and your local waste rules, and until then keep it capped, upright and out of reach of children and pets. Used blades and needles go into a small sealed, covered container before disposal according to local rules.
The “decide later” box
This box is what makes regret unlikely. Nothing in it has left the house. If you go looking for something in it before the date, take that item out and keep it without second-guessing. When the date arrives, whatever is still inside has shown you that you did not miss it, and the box can be donated without being reopened.
Adapting the method, and what comes next
For a small stash, one category may be “everything for card making” and the whole job takes an afternoon. For a large one, break categories down further, such as cotton yarn only or solid cardstock only, and do one per week. The pace does not matter. The order does: one category finished before the next begins.
Decluttering is the editing stage of a bigger job. Once categories are down to what fits, the full plan for organizing a craft room shows where each one should live. And to stop the pile from quietly rebuilding, a short routine for keeping a craft room organized does more than another big clear-out.
Frequently asked questions
How do I get rid of craft supplies without feeling guilty?
Separate the decision from the purchase. The money is spent either way, so ask only whether you would choose the item again today. Passing it to a school, a craft group or another crafter means it gets used, which is a better outcome than keeping it in a bin for another five years.
Where can I donate unused craft supplies?
Schools, preschools, after-school programs, community and senior centers, library maker programs and charity craft groups often accept them, and craft swaps or local giving groups reach other crafters directly. Ask first what is accepted, and give only clean, complete, usable items, bagged in sets and labeled.
How many craft supplies should I keep?
As much as fits comfortably in the space you have assigned to each category. Decide on the bin, shelf or drawer first, choose your favorites until it is filled to just below the rim, and let the rest go. The container sets the number, so you do not have to argue with yourself.