How to Organize a Craft Room: A Step-by-Step Plan
An eight-step plan for a messy craft room: empty one area, sort into families, edit, measure, assign homes, contain, label and review. Worked one shelf or one category per session.
At a glance
What you need
- Six to eight temporary sorting boxes
- Sticky notes and a marker
- Tape measure
- Pencil and paper
- Trash bag and a donation box
The hardest thing about a messy craft room is that every pile depends on another pile. The paper cannot go away until the shelf is clear, and the shelf is full of yarn that has nowhere to live. Pulling everything into the middle of the floor only turns several small problems into one large one.
A better answer to how to organize a craft room is a fixed order of work, repeated on one small area at a time. The plan below has eight steps. You run them on a single shelf or a single category per session, and the room improves in visible pieces instead of getting worse before it gets better.
What to prepare
Nothing here needs buying in advance. Gather these before the first session:
- A clear surface for sorting: a table, a bed or a clean sheet on the floor.
- Six to eight temporary sorting boxes. Shipping boxes, laundry baskets and shoeboxes all work.
- Sticky notes and a marker for naming each temporary box.
- A tape measure, a pencil and a sheet of paper.
- One bag for trash and one box for supplies that will leave the house.
Hold off on new bins. Until you have sorted and measured, you do not know how many you need or what size.
The eight steps in order
- Empty one area: one shelf, one drawer or one corner.
- Sort what came out into broad families.
- Edit out what you no longer use.
- Measure the furniture you already have.
- Assign a home to each family, near where it is used.
- Contain each family in something that fits that home.
- Label every container.
- Review after about two weeks of real use.
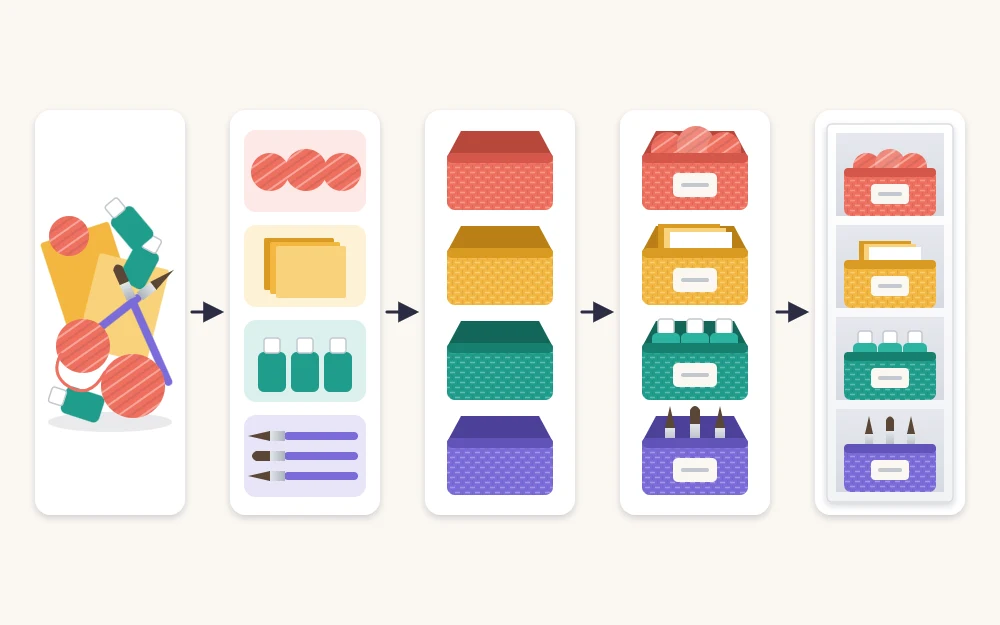
Buying containers before sorting, or labeling before the homes are settled, is how a room gets organized twice.
Steps 1 to 3: empty, sort and edit
Empty only as much as you can finish today. A good test: if the area would take more than about an hour to sort, split it in half.
Sort into broad families first, and resist finer categories for now. Six families cover most rooms:
- Yarn and fiber
- Fabric
- Paper and cardstock
- Paint and other wet supplies
- Tools
- Small parts: beads, buttons, findings and notions
Add a seventh box named “belongs elsewhere” for anything that is not a craft supply. Each item gets one quick decision: which family? If you stall on an item, put it in the nearest family and keep moving.
Editing comes next, while each family is in one place and you can see how much of it there is. Remove dried-out, broken and duplicate supplies, and anything from a craft you have stopped doing. The guide on deciding what to keep and what to pass on covers the harder choices, so this step can stay short.
Steps 4 and 5: measure, then give each family a home
Measure the inside of every shelf, cube and drawer: width, depth and height. Write the numbers on your sheet of paper and keep it; you will use it again when choosing containers. Note which shelves are adjustable.
Then match families to furniture using two rules.
- Near where it is used. Paint lives beside the surface you paint on, thread beside the sewing machine. If you are unsure where each activity should happen, settle that first with the guide to planning zones for the room.
- By how often you reach for it. Everyday supplies go between waist and eye level. Rarely used supplies go high or low. The heaviest items always go on the lowest shelves.
Mark each home with a sticky note before anything moves in. If a family clearly will not fit its home, you have two honest choices: edit further or give it a bigger home. Stacking the overflow on the floor is not a third choice.
Safety note
If the plan includes a tall shelving unit, anchor it to the wall as its manufacturer directs before loading it, and keep the heaviest bins at the bottom.
Steps 6 and 7: contain and label
Now the containers. Use what you own first: shoeboxes for flat supplies, jars for brushes and pencils, the temporary sorting boxes if they fit the shelf. A container is the right size when the family fills it to roughly three quarters, which leaves room for the next purchase. Before you shop for anything, read how to choose bins, boxes and drawers and take your measurement sheet with you.
Label each container on the day it is filled, even with a sticky note. An unlabeled bin gets opened, rummaged through and refilled with the wrong things within a week. Permanent labels can wait until the review; a simple method is laid out in the guide to a labeling system that lasts.
Pacing: one shelf or one category per session
Plan sessions of about one to two hours. Each one ends with the area you emptied fully put back, so the room is usable in between.
A workable sequence for a whole room:
- The main work surface and whatever is piled on it.
- The largest family, which is usually yarn, fabric or paper.
- The remaining families, one per session.
- Tools and small parts last, once you know which zones they serve.
Tip
Stop a session at the end of a step, not in the middle of one. A half-sorted pile left out overnight tends to get pushed back into a drawer.
Adapting the plan to your stash
A small stash or a single craft: the families become sub-groups of one supply, such as yarn by thickness. The eight steps stay the same and the whole job may fit into one afternoon.
A large stash or several crafts: work one craft at a time through all eight steps before starting the next. Expect the project to run over several weekends, and let the “belongs elsewhere” box travel with you from session to session.
Step 8: the two-week review
Put a date on the calendar roughly two weeks after the last session. By then the room will have shown you where the plan was wrong. Walk through it with three questions:
- What is sitting out on a surface? Its home is too far away, too high or too awkward to open.
- Which container is overflowing? It needs a larger size or a second edit.
- Which label did you ignore? Rename it to the word you actually use.
Move those few homes, then make the labels permanent. From there the room needs upkeep, not another overhaul.
Frequently asked questions
Where should I start when the whole craft room is a mess?
Start with the main work surface, because a clear table gives you somewhere to sort everything else. Empty only that one area, sort what was on it into broad families, and put it back before you stop. Then move to your largest group of supplies in the next session.
Should I buy storage bins before I organize?
No. Sort and edit first, then measure your shelves and drawers. Only then do you know how many containers you need and what size will fit. Bins bought earlier are usually the wrong shape, and they tempt you to keep supplies just to fill them.
How long does it take to organize a craft room?
It depends on the size of the stash, so plan by session instead of by deadline. One shelf or one category takes roughly one to two hours. A single-craft corner may be done in an afternoon, while a full room with several crafts often spreads over a few weekends.